One of the most perplexing issues for Harley Davidson owners is when their bike won’t start and all they’re greeted with is a perplexing clicking noise. This challenging scenario is a common symptom of motorcycle starting issues, particularly with the renowned Harley Davidson brand. The signature rumble of a Harley engine is iconic, so when it’s replaced by silence and a faint click, it’s time for some critical Harley Davidson troubleshooting. Fret not—while there are multiple factors at play, a systematic approach can help resolve the underlying cause, whether it’s the battery, starter solenoid, or another culprit. Let’s dive into the diagnostics to get your beloved motorcycle back on the road.
Key Takeaways
- The infamous clicking noise often signals a problem with the battery, but it’s not the only possibility.
- A systematic approach to Harley Davidson troubleshooting can save time and prevent unnecessary repairs.
- Understanding the role of the starter solenoid is crucial when facing motorcycle starting issues.
- Ensure all electrical connections are secure to prevent the dreaded bike won’t start click.
- Even a seemingly charged battery can be deceptive, warranting a closer inspection under load.
- Bench testing the battery is a prudent step if you’re encountering the Harley Davidson not starting clicking noise.
- Professional help may be necessary if basic diagnostics do not resolve the issue.
Understanding Your Harley’s Starting Mechanism
A Harley Davidson’s ability to start and run smoothly relies on the seamless performance of several key engine components. The harmonious interplay between the Harley Davidson ignition, motorcycle fuel system, and bike air intake is crucial for a successful ignition and a steady ride. Let’s delve a bit deeper into the essentials of what makes your Harley roar to life.
At the core of the starting mechanism is the requirement for fuel, spark, and air. First and foremost, the engine demands a supply of fresh and uncontaminated fuel delivered seamlessly through a well-maintained motorcycle fuel system. Without the proper flow of fuel, your chances of hearing anything other than a startup click are slim.
Next, a robust spark is imperative. For that, the condition of the spark plugs and the ignition system must be top-notch. These components come together to ignite the fuel-air mixture in the combustion chamber. Any discrepancy in the Harley Davidson ignition could lead to dismal silence rather than the powerful revving of your motorcycle’s engine.
Last but not least, a proper bike air intake is integral. Your Harley’s engine thrives on a clean and adequate supply of air, which mixes with the fuel to create the correct combustion ratio. Air filters should be clear of debris to ensure a smooth flow into the engine.
- Check your spark plugs for wear and replace if necessary to maintain a sharp spark for ignition.
- Regularly inspect the air filters for blockages which impede the vital supply of air.
- Ensure the fuel quality is up to par, and the system free of leaks or clogs that could disrupt fuel delivery.
Understanding these aspects is critical since if just one element is off, you may be left with the unwelcome clicks instead of your engine turning over. Recognizing the roles of these engine components immensely aids in identifying where issues may arise, simplifying your troubleshooting process.
Common Culprits Behind the Start-up Click
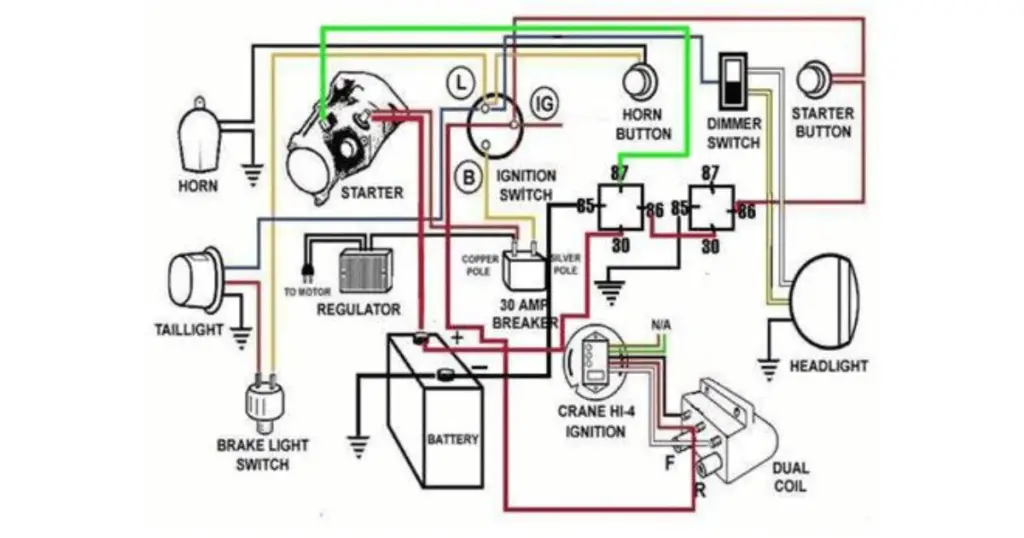
There’s nothing quite as disheartening for a Harley Davidson enthusiast as the sound of a click when the ignition key turns, and the engine fails to roar to life. Identifying the source of the problem is fundamental to getting back on the road. The usual suspects range from Harley Davidson battery issues to starter solenoid failures and even fragile motorcycle wiring. Through meticulous inspection and troubleshooting starting problems, you can pinpoint the issue with precision.
The Battery: Your First Diagnostic Checkpoint
If your Harley is suffering from the dreaded click, start by inspecting the battery. It is not uncommon for a Harley Davidson battery issue to masquerade as a charged system while it has actually lost the vigor to turn over the engine. Hooking up your battery to a charger and identifying if it is below the critical 11.5 volts under load can reveal whether you’re dealing with a charge deficit. Remember, improper winter storage without a tender could be the culprit behind a battery’s poor performance.
Starter Solenoid’s Role in the Clicking Conundrum
As you chase down the source of the issue, the starter solenoid may be the next checkpoint. A telltale sign of a Harley starter solenoid failure is a clicking noise often heard from the left downtube. Checking its operational integrity involves both a tactile and a visual approach—firmly feeling for the click and then ensuring all connections to the solenoid are secure. It is in these intricate moments that a keen sense of motorcycle solenoid repair knowledge becomes invaluable.
Electrical Connections: A Potential Source of the Issue
Lastly, the complexity of motorcycle electrical problems should not be underestimated. Often the problem lies within the spidery network of fragile motorcycle wiring. Inspecting key areas like the ignition switch, kill switch, and starter solenoid connections for signs of corrosion or looseness can be revelatory. A routine inspecting of Harley electricals should top your maintenance list, keeping potential pitfalls at bay and ensuring that your ride is ready for action at all times.
Getting to the Heart of the Problem: Starter Relay Issues
For many Harley owners, the frustration of a motorcycle that won’t start is met with the familiar sound of motorcycle relay clicking. This noise is often a clear indicator of an issue with the starter relay—a component that plays a pivotal role in the bike’s ignition process. Positioned under the seat, this relay acts as a critical bridge between the motorcycle’s ignition key and the starter motor itself. When faced with a potential starter relay failure, a thorough examination is crucial to ensure your bike’s swift return to the road.
- Inspect the Starter Relay: Begin by locating the starter relay under the seat. Listen for a clear clicking sound when the ignition is engaged to confirm that the relay is being activated.
- Check the Connections: Examine the wires leading to and from the starter relay. Loose or corroded connections can prevent the relay from functioning correctly.
- Test for Functionality: If the relay is clicking but the starter motor doesn’t turn over, use a multimeter to test the relay’s continuity. This will help determine if the relay is capable of transmitting electrical current.
- Assess the Starter Motor: A relay in good working order should prompt the starter motor to engage. If not, there is likely a problem with the starter motor itself.
Failure to effectively diagnose Harley relay issues can result in persistent starting problems, leaving you immobile and frustrated. A clicking sound doesn’t always pinpoint a solitary issue, so it’s imperative to investigate the starter relay as part of a comprehensive diagnostic routine. Remember that a malfunctioning relay can mirror the symptoms of a depleted battery, so you’ll want to exclude a battery fault before proceeding with starter relay diagnostics.
With a methodical approach to addressing a starter relay failure, you can avoid the guesswork and aim for a precise repair. If a faulty relay is identified, replacement is often the easiest and most reliable solution. By tackling starter relay issues head-on, you protect your motorcycle against potential starting maladies, ensuring you’re prepared for the next ride without the shadow of a click.
Step-by-Step Guide to Diagnosing Your Harley
When the open road calls, but your Harley Davidson remains silent, responding with just a click, it’s clear troubleshooting steps are necessary. Effective diagnosis begins with careful preparations and an understanding of motorcycle inspection basics. In this section, we’ll provide you with a structured pathway to decode the perplexing noises and symptoms of Harley start issues, ensuring the right measures are applied for a swift resolution.
Initial Checks and Precautions Before Troubleshooting
Safety measures should never be an afterthought when it comes to motorcycle inspections. Therefore, before diving into the crux of Harley Davidson advice for troubleshooting, it’s wise to perform initial checks and utilize precautions. Always start by disconnecting the battery to prevent electric shock or further system damage. This fundamental step ensures a safe workspace as you proceed to scrutinizing the battery’s charge level, verifying cable tightness, and scanning for any visible cable damage. A thorough evaluation at this stage not only heightens safety but streamlines the troubleshooting process.
Decoding the Sounds: What Different Clicks Mean
Interpreting clicking noises emerging from your Harley can be telling, as different clicks often indicate distinct issues. For example, a rapid succession of clicks could point towards a solenoid problem, while a solitary sharp click may hint at a battery that doesn’t hold enough charge. Diagnosing motorcycle sounds is an art of acute auditory attention, where interpreting these clicks provides early insight into where the main issue might lie.
Symptom Analysis: From Clicking to Cranking
When analyzing motorcycle symptoms to resolve cranking issues, heed the nuances of your Harley’s behavior as you attempt to start it. Is the fuel gauge erratic? Does a single click accompany the silence, or are you encountering a series of them? Evaluating these symptomatic responses helps shape an informed hypothesis, directing the diagnostic path toward specific areas of concern—be it the battery, solenoid, or a potentially intricate electrical conundrum. Seamlessly, from interpreting the quiet whispers of a click to the bold statements of the cranking motor, these clues bring us closer to restoring your Harley’s thunder.
Harley Davidson Not Starting Clicking Noise: Specific Diagnostic Techniques
When confronted with a Harley that won’t start and emits only a clicking noise, delving into specific Harley diagnosis techniques is pivotal. Navigating through methods to achieve a clicking noise resolution calls for a strategic blend of know-how and practical motorcycle diagnostic methods. To get your engine from silent standoff to the characteristic Harley growl, follow these targeted diagnostics designed for precision and effectiveness.
- Begin with a Voltage Check: Grab your multimeter and measure the battery voltage. Motorcycles like Harley Davidson often experience battery-related starting issues after periods of inactivity.
- Testing Continuity: The next step is to test for continuity through the ignition switch. This can either confirm the integrity of the switch or reveal an electrical open circuit as the culprit.
- Fuel System Examination: Check the fuel pump and injectors to ensure they’re functioning correctly. A disrupted fuel supply could be the reason behind your motorcycle’s reluctance to start.
- Connection Verification: Inspect all electrical connections, particularly those leading to the starter motor and solenoid. Ensure they’re tight, clean, and exhibit no signs of corrosion.
- Listen to the Solenoid: If the clicking seems to originate from the starter solenoid, using the tactile approach is essential. A failing solenoid may emit a series of rapid clicks that indicate the need for replacement.
- Bench Test the Battery: If suspicion still falls on the battery, consider bench testing it by hooking up a known good battery and assessing the starter response when bypassing the motorcycle’s electrical system.
The diagnostic pathway outlined above represents a logical progression from basic checks to more specialized assessments. By adopting a thorough approach, riders can systematically identify the issue behind the clicking noise resolution, making the path to fixing your Harley clear and direct. Knowing when and how to employ these motorcycle diagnostic methods not only helps in resolving current issues but also strengthens your ability to preempt future complications.
- Battery Management: Monitor and maintain your Harley’s battery health to prevent common starting issues in the long run.
- Wiring Woes: Regular inspections of your bike’s wiring can catch early signs of wear and tear, keeping electrical connections in prime condition.
- Fuel Functionality: Keep the fuel system clean and fully operational via frequent checks to ward off ignition issues.
Adeptly navigating the starting issue of a Harley Davidson can ultimately be distilled down to an informed and meticulous diagnostic routine. By adhering to these strategies, riders can often self-resolve minor starting issues and decide wisely when professional assistance is required for the more complex challenges.
Expert Tips for Quick Fixes and When to Seek Professional Help
Whether you’re on a long-awaited road trip or about to start your daily commute, encountering starting issues with your Harley can be extremely frustrating. But fear not, some problems can be tackled swiftly with the right know-how and sometimes without even leaving your driveway. Here we’ll explore some proactive measures for on-the-go battery solutions and DIY motorcycle solenoid repair, as well as indicators that indicate the need for professional motorcycle repair.
Quick Battery Revival Tips for the Road
- If you’re facing starting troubles and suspect a battery issue, the first quick fix to consider is jump-starting. Utilize jumper cables and connect them to a functioning motorcycle battery to breathe life back into your Harley’s battery.
- For motorcycle battery recovery, keeping a portable charger or a set of jump leads in your toolkit can prove invaluable. While these on-the-go battery solutions are not permanent fixes, they can get you rolling back to civilization where a more thorough fix can be applied.
- Regular Harley battery charging is essential, especially after prolonged periods of inactivity. If you find your battery repeatedly dying, consider investing in a higher-quality replacement to avoid future occurrences.
Solenoid or Relay Replacement: A DIY Possibility?
DIY motorcycle solenoid repair is certainly a possibility for those who have a basic understanding of their bike’s electrical system and are comfortable handling tools. Armed with a relay replacement guide, you can address these issues with confidence.
- Before attempting any solenoid repairs or replacements, ensure your motorcycle is turned off and the battery is disconnected to avoid any electrical mishaps.
- Relay and solenoid issues can often be diagnosed with a multimeter—an indispensable tool for any Harley self-service enthusiast.
- Paying attention to the advice from motorcycle forums and guides can provide step-by-step instructions for a successful relay replacement.
When to Call in the Cavalry: Recognizing Complex Electrical Faults
While some electrical problems can be solved by an avid DIY’er, it’s important to recognize when you’re out of your depth. Complex electrical issues such as irregular voltage drops, unseen shorts, and intricate wiring problems may require a deeper understanding of your Harley’s electrical architecture. If you find yourself scratching your head in confusion, it’s time to consult a professional motorcycle repair service. These experts have the tools, technology, and training to diagnose and fix electrical problems that go beyond the scope of Harley self-service. Remember, it’s not just about saving time—it’s also about ensuring your safety and preventing further damage to your motorcycle.
Conclusion: Reviving the Roar of Your Harley
When the familiar rumble of a Harley Davidson is replaced by the disconcerting sound of clicking, it signals the beginning of troubleshooting for many riders. This unmistakable cue often indicates a battery or solenoid problem that requires attention. We’ve walked through a comprehensive approach to address these issues, emphasizing that consistent checks, routine maintenance, and regular inspection are pivotal. These measures drastically reduce the likelihood of your engine remaining silent when you’d rather be hitting the open road. The Harley Davidson troubleshooting conclusion is clear: proactive care curtails the onset of common starting woes.