For those who love the open road, the iconic rumble of a Harley beneath them is an experience unmatched. But even this legendary motorcycle isn’t immune to wear and tear. In particular, it’s essential to be aware of these bad Harley compensator symptoms, as neglecting them can lead to more serious mechanical issues.
As an avid motorcyclist with extensive experience, I know that the compensator, a critical component of your bike’s primary drive system, needs to run smoothly for an optimal ride. In this article, I’m going to decode the various signs of a faulty compensator, getting you clued-up not only about these alarming symptoms of a bad compensator, but also on preventative measures which can potentially save you from unexpected breakdowns. After all, understanding your Harley is the first ride towards maintaining its enduring legacy. Are you ready?
Related:
– Guide to Finding The Best Harley Compensator Upgrades Today
– Baker Compensator Review: An Unbiased Analysis and More
– Man O-War Compensator Review: Pros, Cons, and More
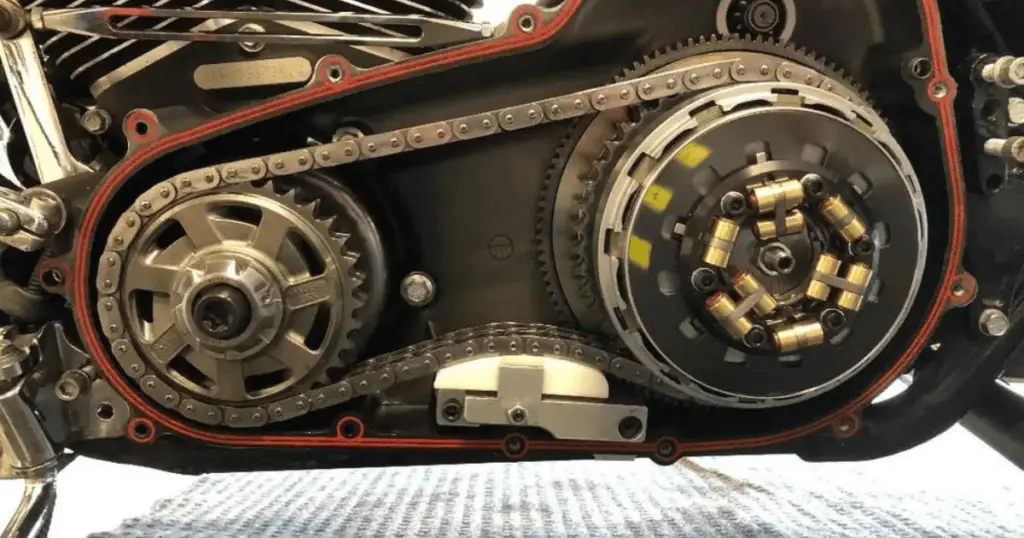
What Are The Components of The Compensator?
In my mind, I break down the components of the compensator into a few key pieces:
- Primary Chain: the primary chain Transfers power from the engine’s crankshaft to the clutch and transmission, moderated by the chain tensioner to avoid having too much slack in the system.
- Compensator Sprocket: Interfaces with the primary chain, absorbing engine torque fluctuations to protect the chain.
- Spring Pack: Positioned behind the compensator sprocket, it moderates engine torque spikes, aiding in smooth power delivery.
- Sliding Cam: Works with the spring pack to control compensator sprocket movement, managing force transmission to the primary chain.
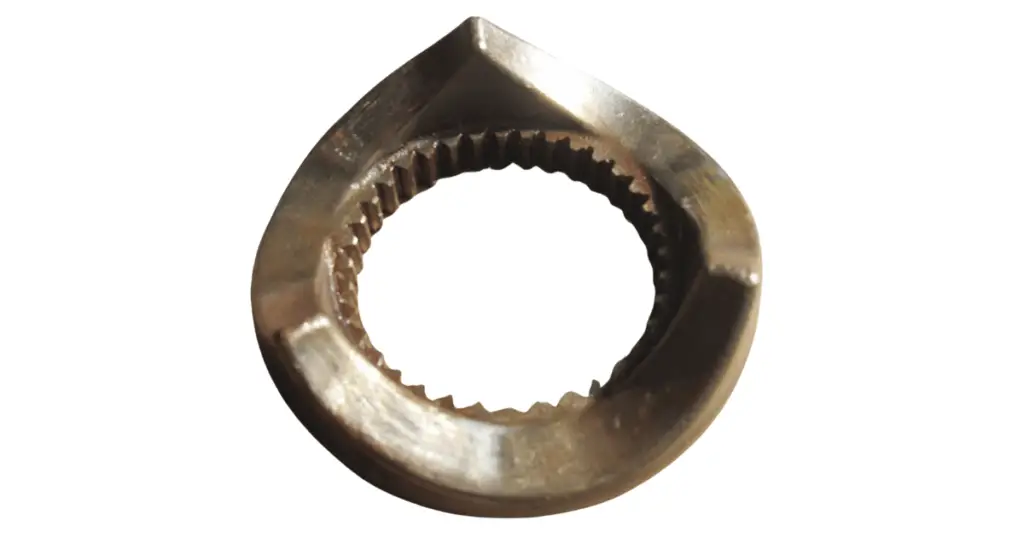
- Retaining Ring, Washer, and sprocket nut: Secure the compensator sprocket and spring pack to the crankshaft, ensuring alignment.
- Bolts and Fasteners: Maintain the compensator assembly’s integrity and stability.
- Ramp and Cam Mechanism: Featured in some designs, this further dampens torque variations from the engine.
How Does The Compensator Work On A Harley
The compensator in a Harley Davidson bike serves a vital purpose. It acts as a sort of shock absorber for the starter mechanism, smoothing out any rough pulses generated by the engine. This ensures that these pulses don’t transmit along the drivetrain, causing discomfort to the rider or premature wear and tear of components.
What Does It Do and Why? (Diving Deeper)
The compensator is designed to balance the forces exerted by the engine on the drivetrain. With that being said, it effectively does a few things:
- Absorbing Torque Spikes: When the engine generates power, especially in large-displacement V-twin engines like those in Harley Davidsons, it doesn’t do so in a perfectly smooth manner. There are peaks and troughs in the power delivery. The compensator helps to absorb these torque spikes, ensuring a smoother transfer of power.
- Reducing Stress on Components: By smoothing out these fluctuations, the compensator reduces stress on other components of the motorcycle, such as the transmission and drive belt or chain. This prolongs the life of these parts and enhances the motorcycle’s reliability.
- Improving Ride Quality: The smoother power delivery also translates to a more comfortable and controlled riding experience. It reduces the jerky motion that can occur when the engine’s power is unevenly transmitted to the wheels.
What Are The Signs Of A Worn Out Harley Compensator?
A worn out harley compensator can manifest itself in a few different ways. Here are some of the most common Harley bad compensator symptoms:
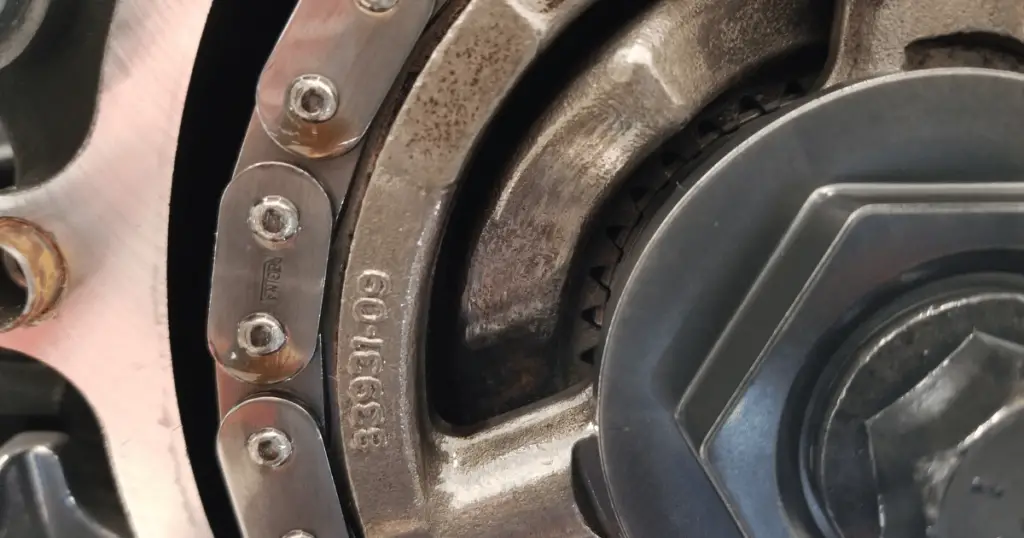
Internal Sprocket Noise
One of the first signs that your compensator may be on its way out is a loud clanging noise emanating from your bike’s primary. It can sound as though rocks or marbles are being tossed around inside the primary cover. This bad compensator sound, resembling the sound of rocks or marbles, often arises when the bike starts. It can signal that the compensator is failing to adequately absorb the engine’s torque spikes, leading to increased stress on the primary chain and sprocket.
Starting Issues
Another common symptom of a failing compensator is difficulty starting, particularly when the engine is hot. It can refuse to start entirely in some cases. Before you peg this down to a faulty compensator, however, it’s worth checking the status of your battery, as a weak or corroded battery can also cause starting problems.
Related:
> How Long Do Harley Batteries Last Actually? (Surprising)
> Best Battery For Harley Davidson Motorcycles: Mechanic Tells
Frequent Kickbacks, Misfiring, and Stuttering
Frequent kickbacks are another sign of a failing compensator. Kickbacks occur when the air/fuel charge in a piston fires prematurely, before the piston has had a chance to reach the top center. A faulty compensator can lead to more frequent kickbacks, which in turn can cause rough running, misfiring and stuttering.
Which Engines Were Most Affected
Harley compensator problems are particularly common in models with the 103 engine, making these compensator symptoms – specifically in the 103ci Twin Cam engine – the most prominent of the bunch. The compensator in these models was known to go bad, particularly between 2007 and 2012.
Related articles:
> Is The Twin Cam 88 A Good Motor? Yes and No (Here’s Why)
> Is The Twin Cam 96 A Good Motor? Yes and No (Here’s Why)
How To Tell If A Harley Compensator is Bad (Diagnostic Procedure)
Diagnosing a bad compensator can be tricky, but there are a few things you can check. Start by listening for the aforementioned clanging or clunking noises, particularly on startup. You can also check for excessive vibration or difficulty shifting into first gear or neutral.
Another thing to look out for is any signs of metal particles in the primary oil. Excessive amounts of metal shavings could indicate that the compensator is wearing out and shedding metal.
What Can You Do When A Harley Compensator Is Bad?
If you’re dealing with a bad compensator in your Harley, you have a few options available to you. These include:
- diagnosis:
- Identify the Symptoms: Common signs of a failing compensator include unusual noises (like clunking or rattling) from the primary chaincase, rough or jerky operation, especially during acceleration, and difficulty in shifting gears.
- Professional Inspection: If you’re not confident in diagnosing the problem yourself, it’s advisable to have a professional mechanic inspect the bike. They can accurately diagnose whether the compensator is indeed the issue.
- Repair or Replacement:
- OEM Replacement: If the compensator is indeed failing, the most straightforward solution is to replace it with an original equipment manufacturer (OEM) part. This ensures compatibility and reliability.
- Aftermarket Options: Alternatively, you might consider aftermarket compensators. Some aftermarket parts offer improved durability or performance over the OEM parts, especially for riders who have modified their bikes for higher performance. In most cases, a modified bike will call for a compensator upgrade to prevent issues down the line.
Can You Fix It Yourself?
If you’re mechanically inclined, you might be able to tackle the replacement of the compensator yourself. However, it’s a complex job that requires a good understanding of the inner workings of a Harley Davidson motorcycle.
By the way, if you’re DIY inclined, you should check out parts of my maintenance series:
> Complete Harley Davidson Tire Size Chart (PDF)
Brief DIY Guide
Here’s a brief step-by-step guide on how to replace a bad compensator:
- Start By Removing The Outer Primary inspection Cover from the primary housing. (Examine the clutch pack while you’re at it)
- Remove The Primary Chain, spring pack And Clutch Assembly.
- Once Those Are Out Of The Way, You Should Be Able To See The Compensator. Remove It And Replace It With A New One, Making Sure To Follow The Torque Specifications In Your Service Manual.
- Reinstall Everything In Reverse Order, Making Sure To Replace The Primary Cover Gasket And Apply A Fresh Coat Of Primary Oil.
Remember, this is a highly simplified guide, and the actual process can be much more complex. If you’re not comfortable with this level of mechanical work, it’s best to leave it to the professionals.
Read next: Harley Automatic Compression Release Problems (FIXED!)
More About Seeing A Professional
While you might be able to fix a bad compensator yourself, it’s usually best to leave this job to the professionals. A seasoned Harley mechanic will have the tools and experience necessary to diagnose and fix the issue quickly and efficiently.
Verdict and Conclusion
Harley Davidson compensator problems can cause a wide range of issues, from loud noises to starting problems. However, with the right knowledge and resources, it’s possible to diagnose and fix these issues. Whether you choose to tackle the job yourself or leave it to the professionals, remember that timely maintenance is key to preventing compensator problems in the first place.
Read more:
> ThunderMax Tuner Reviews: A Complete, In-Depth Analysis
> The Best Harley Davidson Tuner Is Revealed (+5 Alternatives)
> The Best Tuner For Milwaukee 8 114 Engines (+Alternatives)
> Best Tuner for Harley 103 Gets Revealed (By An Expert)
> The Best Oil For Harley Davidson Motorcycles Gets Revealed
> Best Oil For Harley Transmission And Primary Gets Revealed
> The Best Oil for M8 Harley Engines Gets Revealed (Complete)
> Best Harley Seat for Tall Riders (A Comprehensive Guide)
> Best Spark Plugs For Harley Davidson (Im An Actual Mechanic)
> The Best Stage 2 Air Cleaner for Harley Davidson Motorcycles
> Best Battery For Harley Davidson Motorcycles: Mechanic Tells
> ThunderMax vs Power Vision Tuner Shootout
> The Best Fuel Stabilizer for Harley Motorcycles Revealed
> Best Harley Touring Tires: Top Picks for Long-Distance Rides
> ThunderMax vs Power Commander: Who Packs The Punch +Value?