Motorcycle enthusiasts often seek to optimize the performance of their bikes, with the drive train being a key point of focus. The compensator sprocket, especially the Baker drivetrain compensator sprocket, is a component that plays a critical role in the smooth transfer of power from the engine to the rear wheel, affecting both the ride quality and mechanical longevity of the motorcycle. The Baker compensator has emerged as a popular upgrade option, especially for Harley-Davidson touring models equipped with 96″ and 103″ engines. It’s designed to offer an enhanced riding experience, greatly extending the bike’s performance over the stock compensator setup, with a focus on quiet operation and refined function.
This Baker compensator review will highlight improved clutch operation and increased durability, which is commonly reported amongst other users. Baker Drivetrain’s compensator kit, including a compensating cam lobe diameter feature, aims to address common issues faced with stock components, such as noise and wear, which can detract from the motorcycle’s performance. Given the significance of such components in the performance of a motorcycle, a detailed examination and review of Baker’s solution provides valuable insight into its true effectiveness and potential benefits for riders.
Related read: Guide to Finding The Best Harley Compensator Upgrades Today
An Introduction to The Baker Compensator

Baker compensators are designed to enhance the performance and longevity of Harley-Davidson’s drivetrain. Known for their robust construction and relentless durability, they are a popular choice among riders seeking to upgrade their motorcycle’s primary chain system.
Design and Functionality
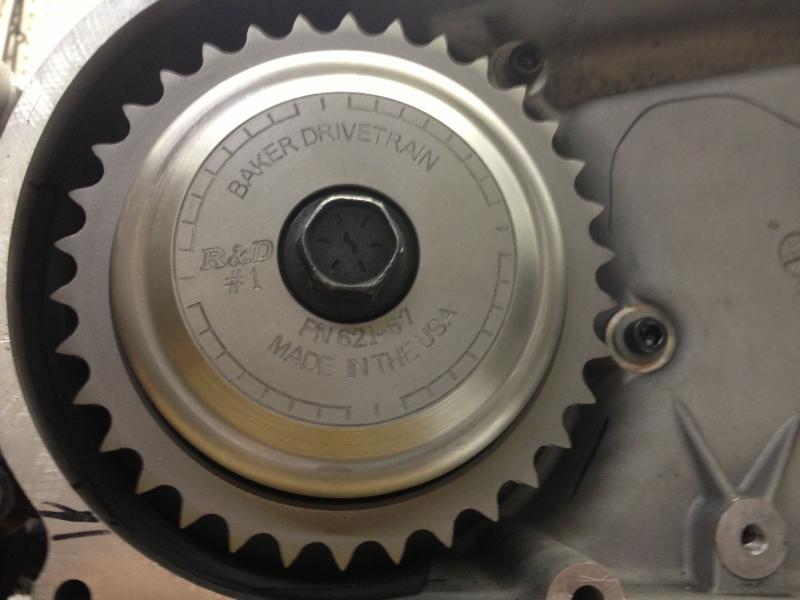
The compensator by Baker Drivetrain plays a pivotal role in the primary drive of a Harley-Davidson (HD) motorcycle. Its primary function, enhanced by the compensating cam lobes, is to absorb and mitigate the engine’s torque fluctuations, ensuring a smooth power transfer to the rear wheel. This is particularly beneficial in reducing the clunking noise and vibrations commonly associated with Twin Cam engines. Baker’s compensators are recognized for their improved clutch operation and clutch hub bearings durability, which is credited to their innovative design that distributes stress more evenly across the component and includes a manual chain adjuster for optimal performance. The durability is often attributed to the choice of materials and the precise engineering standards upheld by Baker Drivetrain, a manufacturer based in the USA.
Key Design Features:
- Material Selection: Uses high-grade materials to withstand stress and heat.
- Spline Interface: Engineered to reduce the occurrence of cracks under stress.
Models and Compatibility
Baker compensators are compatible with a wide range of Harley-Davidson models, including the Twin Cam, Softail, Dyna, and Touring lines. They are meticulously designed to fit directly into the motorcycles’ primaries without extensive modifications. The compatibility with different models ensures that a broad base of Harley-Davidson riders can benefit from this upgrade to their machines.
Construction Materials and Quality
The Baker compensator’s reputation hinges on its construction materials and attention to quality. Both durability and manufacturing practices are crucial in determining the overall performance and longevity of the part.
Overview of The Used Materials and Their Durability
The materials selected for Baker compensators, including an annular oil distribution system, are critical for ensuring durability. Typically crafted from high-grade steel, these compensators, with their compensating cam lobe diameter and axial thrust surfaces, are expected to handle the significant forces exerted by the motorcycle’s powertrain, including inherent power pulsations. Durability concerns, specifically related to the spline’s ability to withstand stress without cracking, are paramount. Issues such as radial cracks along the spline have been noted in cases where the pressure point may exert excessive force. Assuring the compensator can handle such forces is a key aspect of its design.
Quality Assurance Through Premium Manufacturing
Quality assurance processes are integral to producing Baker compensators that meet rigorous standards. These components, featuring supportive spokes structurally tie, are usually subject to thorough testing protocols to detect any potential workmanship flaws before they reach the consumer. The manufacturing aspect covers precision engineering to ensure exact fitment and operation. Flawless manufacturing is essential, as even minor discrepancies can lead to noise, wear, or failure under operation. The quality of the compensator directly impacts the shifting smoothness and noise levels of the motorcycle, indicating the necessity for meticulous manufacturing standards.
Installation Process For The Baker Compensator
The installation of a Baker compensator, a final solution for Harley Davidson models, is a detailed task that typically improves a motorcycle’s engine and primary oil system performance by reducing noise and enhancing component reliability. It involves replacing the stock compensator with a Baker unit, which is designed to better handle the torque of the engine and provide smoother operation.
Step-by-Step Guide To Installing The Baker Compensator
- Prepare the Motorcycle: Secure the bike, focusing on the sprocket hub, on a stable platform to ensure safety throughout the installation process.
- Remove Necessary Components: Carefully remove the outer primary cover to access the compensating sprocket This may involve draining the primary fluid.
- Extract the Existing Compensator: Using appropriate tools, remove the bolt and retaining hardware from the stock compensator located on the sprocket shaft.
- Install the Baker Compensator: Align the new compensator onto the sprocket shaft making sure it seats properly. Install the new components as per the manufacturer’s instructions.
- Reassemble: Once the Baker compensator is in place, reattach any removed parts and the primary cover.
- Testing: Prior to completing the installation, rotate the motor to ensure the new compensator is moving freely without binding.
- Final Steps: Refill the primary with the required amount of lubricant and double-check all work for accuracy.
Tools and Labor Requirements For The Installation Process
- Tools Needed:
- Set of sockets and wrenches
- Torque wrench
- Primary cover gasket remover
- Lubricant service equipment
- Labor:
- The installation is a moderately complicated task and should ideally be performed by an experienced technician or a skilled DIY’er.
- The time required for labor can range from 2 to 3 hours depending both on expertise and whether it is the technician’s first time installing a Baker compensator.
- Special Considerations:
- Attention should be given to the torque specifications when tightening bolts on the sprocket shaft and inner primary to avoid damage.
- Accurate reinstallation of the components is crucial for maintaining the integrity of the engine’s performance.
Overview of Baker’s Warranty and Customer Support
Baker Drivetrain offers a limited warranty policy on compensators, safeguarding customers against manufacturing defects. The details of the warranty duration and coverage specifics are essential to review before purchase.
Customers seeking returns and exchanges are advised to consult the company’s stipulated policies. Baker’s customer support aims to assist with inquiries and provide guidance on warranty claims. It is advisable to keep records of interactions and transactions for future reference in the event of a customer support need.
Benefits of The Baker Compensator
In assessing the advantages brought by an aftermarket compensator like the Baker compensator, two key aspects often come to the forefront: its impact on the engine and transmission performance and its ability to reduce noise within the primary drive system.
Impact on Engine and Transmission Performance
Aftermarket compensators such as the Baker compensator are designed to optimize engine performance and safeguard transmission assemblies. They achieve this by featuring improved durability and materials built to withstand the stresses of high-powered engines. Users report that the right compensator sprocket can lead to a smoother transfer of power to the drive train.
- Enhanced springs and durability offer better torque handling.
- Reinforced design contributes to a more reliable transmission response.
Noise Reduction Capabilities
The concerns regarding noise in the primary drive are often addressed by these compensators. They work to reduce noise, especially the clunking and rattling that may arise from the stock parts wearing out or failing to absorb the engine’s power pulses efficiently.
- The Baker compensator, specifically, is noted for having noise reduction benefits because of the substantial material enhancements over stock components.
- Design improvements, such as refined springs and sprocket profiles, can result in a quieter operation when compared to the original equipment or even other aftermarket options like the S&S upgrade.