Unleash the hidden shine of your beloved vehicle with my definitive DIY paint correction guide! This comprehensive tutorial is designed to empower you, whether you’re a beginner or a seasoned car enthusiast, to restore your car’s paintwork to its original gleaming glory, right from the comfort of your garage. I’ll walk you through the step-by-step process, demystifying the art of paint correction and turning it into a manageable DIY task. Plus, I’ve included invaluable professional resources to elevate your understanding and skills. Get ready to transform your vehicle from a dull, scratched surface into a mirror-like finish that exudes brilliance.
Roll up your sleeves, dive into this guide, and let’s bring back your car’s sparkle together!

Introduction to Car Detailing and Paint Correction
Welcome to the world of car detailing and paint correction. If you’re passionate about keeping your car looking its best, you’ve probably heard of the term ‘paint correction’. But what does it truly mean, and why is it so important? Paint correction is the process of removing surface imperfections on your car’s paintwork, such as swirl marks, scratches, and superficial damage. This process not only restores the vehicle’s appearance but also helps maintain its value.
Car detailing and paint correction are like giving your car a deep cleanse and rejuvenating spa treatment. It’s about restoring your vehicle’s paintwork to its original, pristine condition, or even better. It’s not just about vanity; it’s about the love and respect for your car, and the desire to prolong its life and maintain its value.
The world of car detailing and paint correction is vast and fascinating. It involves a lot of knowledge, skill, patience, and the right tools and products. This guide aims to provide a comprehensive understanding and step-by-step approach to DIY paint correction. It’s time to roll up your sleeves and dive right into it.
[Know How To Dry Your Car Without Scratching It]
Understanding the Basics: Swirl Marks, Scratches, and Superficial Damage
Swirl marks, scratches, and superficial damage are all too common blemishes on car paintwork. They can be caused by a variety of factors, from improper washing techniques and harsh weather conditions to dust and debris impact. Understanding these imperfections is the first step in effective paint correction.
Swirl marks are circular microscopic scratches on the surface of the car paint. They typically occur when the car is cleaned with a dirty cloth or sponge, which drags tiny particles of dirt across the paint surface. Swirl marks are particularly visible on sunny days or under bright light, giving the paintwork a dull, tired appearance.
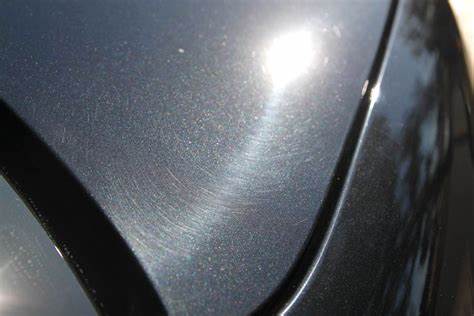
Scratches, on the other hand, are deeper than swirl marks and can be classified into different types, such as plastic scratches and paint transfer, which we will discuss in the next section. Superficial damage refers to minor imperfections on the paint surface that do not penetrate the clear coat. These could be caused by bird droppings, tree sap, or small stones hitting the car.

Different Types of Scratches: Plastic Scratches and Paint Transfer
In the world of paint correction, understanding the different types of scratches is crucial. Plastic scratches and paint transfer are two common types of scratches that can mar your car’s appearance.
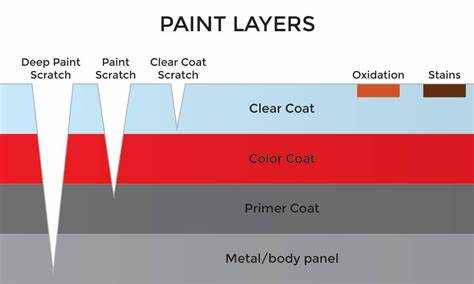
Plastic scratches are caused when a plastic object comes into contact with the car paint, leaving behind a mark. This could be from a shopping cart, a car door, or even a child’s toy. While these scratches may look severe, they usually only affect the clear coat and can be buffed out with the right techniques and products.
Paint transfer is another common issue. It occurs when your car’s paintwork comes into contact with another painted object, resulting in a transfer of paint. This could be from a collision with another car or a painted wall. Paint transfer can be more challenging to remove than plastic scratches, but with the right approach and tools, it can be done effectively.

The Role of Dust and Debris in Damaging Car Paint
Dust and debris are silent assassins for your car paint. They may seem harmless, but they can cause significant damage to your vehicle’s paintwork over time. Dust and debris can lead to tiny scratches and swirl marks, dulling the shine of your car’s paintwork.
When these particles settle on your car’s surface, they can be dragged across the paintwork when you’re washing or wiping the car, creating fine scratches. Over time, these scratches accumulate, leading to a dull and faded appearance.
Even worse, if dust and debris are not removed promptly, they can become embedded in the paintwork. This can cause deeper scratches and more severe damage, which can be harder to correct.

The Process of Removing Embedded Dirt
Removing embedded dirt is a crucial step in paint correction. Embedded dirt refers to tiny particles of dirt and debris that have become lodged in the paintwork. This can cause deeper scratches and dull the paintwork’s shine.
The first step in removing embedded dirt is to thoroughly wash your car. This helps to loosen and remove the bulk of the dirt. It’s important to use a high-quality car shampoo and a soft, clean sponge or mitt to avoid causing further scratches.
After washing, you can use a clay bar to remove the remaining embedded dirt. A clay bar is a special tool made from a malleable clay-like substance. When rubbed over the paintwork, it picks up and removes any remaining dirt particles. This leaves the paintwork smooth and ready for the next steps of paint correction.

Using the Proper Supplies for Paint Correction
Paint correction is a process that requires the right tools and products. Using the wrong supplies can lead to poor results or even further damage to the paintwork.
The basic supplies you’ll need for paint correction include a car shampoo, a clay bar, a dual-action polisher or buffer, polishing pads, and a high-quality car polish. You’ll also need a good quality wax to seal and protect the paintwork after correction.
Each of these supplies plays a critical role in the paint correction process. The car shampoo and clay bar are used to clean the car and remove embedded dirt. The dual-action polisher or buffer, along with the polishing pads and car polish, are used to remove the swirl marks and scratches. Finally, the wax is used to protect the newly corrected paintwork and give it a beautiful, shiny finish.
[su_youtube_advanced url=”https://www.youtube.com/watch?v=hIK8Pa9P14s”]
Step-by-Step Guide to Paint Correction
Now that we’ve covered the basics, let’s dive into the step-by-step process of paint correction.
- Wash Your Car: Start by thoroughly washing your car to remove as much dirt and debris as possible. Use a high-quality car shampoo and a soft, clean sponge or mitt. Rinicse the car thoroughly to ensure all soap is removed.
- Clay Bar Your Car: After washing your car, it’s time to use the clay bar. This will pick up and remove any remaining embedded dirt. Rub the clay bar lightly over the paintwork, making sure to keep it lubricated with a clay lubricant or soapy water.
- Polish Your Car: The next step is to polish your car. This is done using a dual-action polisher or buffer, a polishing pad, and a high-quality car polish. Start by applying a small amount of polish to the pad, then work it into the paintwork using the polisher. Make sure to work in small sections and not to apply too much pressure.
- Wax Your Car: After polishing, it’s time to wax your car. This will seal and protect the paintwork, giving it a beautiful, shiny finish. Apply the wax using a soft, clean cloth or a wax applicator. Buff off the excess wax using a microfiber towel.
- Check Your Work: Finally, check your work. Look at the paintwork under different lighting conditions to make sure all swirl marks and scratches have been removed. If you notice any imperfections, repeat the polishing and waxing process until you’re satisfied with the result.
Best Paint Correction Kits on the Market
There are several excellent paint correction kits available on the market. These kits typically include all the necessary supplies for the paint correction process, such as car shampoo, a clay bar, a dual-action polisher or buffer, polishing pads, car polish, and wax.
Some of the best paint correction kits on the market include the Meguiar’s G3500 Dual Action Power System Kit and the Chemical Guys BUF_209X Complete Detailing Kit. If you’re looking to treat just a scratch(es), then Mother’s California Gold is my personal preference.
Each of these kits provides high-quality products and tools that are designed for effective paint correction. They’re also user-friendly, making them suitable for both beginners and experienced DIYers.
Scratch Removal: Preventative and Reactionary Measures
Scratch removal is a crucial part of paint correction. However, it’s also essential to take preventative measures to avoid scratches in the first place. This can save you a lot of time and effort in the long run.
Preventative measures include regular washing and waxing of your car, using a soft, clean cloth or sponge for washing, and parking your car in a safe, covered area to avoid damage from the elements and falling objects.
Reactionary measures involve addressing scratches as soon as they occur. This can prevent them from becoming deeper and more difficult to remove. Depending on the severity of the scratch, you can use a scratch remover product, or you may need to polish and wax the affected area.
The Importance of Waxing: Waxing Your Car With a Buffer vs. By Hand
Waxing is a critical step in the paint correction process. It seals and protects the paintwork, helping to prevent future scratches and swirl marks. It also gives the paintwork a beautiful, shiny finish.
There are two main methods of waxing your car: using a buffer or doing it by hand. Each method has its advantages and disadvantages.
Waxing your car with a buffer is faster and more efficient. It also provides a more even application of the wax. However, it requires a bit of skill and practice to avoid causing damage to the paintwork.
Waxing your car by hand, on the other hand, gives you more control over the process. It’s also more gentle on the paintwork, making it a safer option for beginners. However, it can be more time-consuming and may not provide as even a coating of wax.
Benefits of Waxing Your Car for a Shiny Finish
The benefits of waxing your car extend beyond just a shiny finish. Waxing provides a protective barrier over the paintwork, helping to prevent scratches, swirl marks, and other forms of damage. It also helps to repel water, which can prevent rust and corrosion.
Furthermore, waxing enhances the color and shine of your car’s paintwork, giving it a fresh, vibrant look. It can also make your car easier to clean, as dirt and debris are less likely to stick to a well-waxed car.
Ultimately, waxing your car is a small investment of time and effort that can yield significant rewards in terms of maintaining your car’s appearance and value.
Conclusion and Final Thoughts on Paint Correction
Paint correction is a process that requires knowledge, skill, patience, and the right tools and products. However, the rewards are well worth the effort. A well-executed paint correction can restore your car’s paintwork to its original, pristine condition, or even better. It can also help to maintain your car’s value and prolong its life.
It’s important to remember that paint correction is not a one-time process. It’s an ongoing commitment to maintaining your car’s appearance and value. Regular washing and waxing, along with prompt attention to scratches and other forms of damage, can help to keep your car looking its best for years to come.
Do You Need to Do Paint Correction After Ceramic Coating Applications?
Ceramic coating is a popular option for protecting car paintwork. It provides a strong, durable barrier that can help to prevent scratches, swirl marks, and other forms of damage. However, it does not eliminate the need for paint correction.
Before applying a ceramic coating, it’s important to ensure that the paintwork is in the best possible condition. This means removing any swirl marks, scratches, and other forms of damage. If these imperfections are not corrected before the ceramic coating is applied, they will be sealed in and will be visible through the coating.
After the ceramic coating is applied, regular maintenance is still necessary to keep the coating and the paintwork underneath in good condition. This includes regular washing and occasional polishing and waxing.
In conclusion, paint correction is a critical part of maintaining your car’s appearance and value. Whether you’re a DIY enthusiast or prefer to leave it to the professionals, understanding the basics of paint correction can help you make informed decisions about how to best care for your car.